
 Track Changes is one of the features of Microsoft Office Word which you may not have come across before, but which is an invaluable tool. When you first come to use it, you may find it confusing, but once you are familiar with it, you will find it indispensable and really quite straightforward. In this article, we will help you familiarise yourself with the key features of Track Changes.
What is Track Changes for?
Track Changes is a tool used for reviewing documents. It is an excellent resource for proofreading and providing feedback on a document. One of its key features is that it allows the user to edit a document whilst still maintaining the original information. Remember the school work which you got back from your teacher, with red pen highlighting issues within your work and comments in the margin to help you improve it? Track Changes does just this.
How does it work?
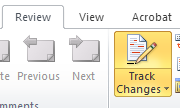
Using Track Changes is very straightforward; the user simply needs to click on the “Review” tab at the top of the Word document and then click on the “Track Changes” button.
Once this feature has been selected, the user can then edit the document, exactly as though they are correcting it, and the feature will “track” the changes whilst maintaining the original document. So, for instance, if you delete a word and replace it with a correction, Track Changes will strike through that word and then underline your suggested correction:

As you can see, a vertical line will also appear beside any line of text where a change has been suggested, so that corrections can easily be located in the document.
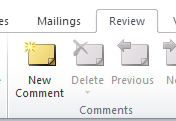
There is also a feature to enable users to add a comment, which will appear in the margin. Simply highlight the text which the comment refers to and then click the “New Comment” button in the “Review” pane:
These features mean that a document can then be passed to someone else to check the changes which have been suggested against the original copy. If you have studied ILSPA’s Legal Secretaries Diploma, you will have been asked to accept or reject some tracked changes in one of your assessments.
If the tracked changes do not automatically appear highlighted in a different colour when you open a document, you will need to select “Final: Show Markup” from the drop-down menu in the Review section of your toolbar.
How do I make amendments to a document containing tracked changes?
You can accept or reject any suggested changes in two different ways.
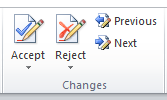
Firstly, you can use the “Accept” and “Reject” buttons, which can be found within the “Review” tab.
These allow you to work your way through each suggested change in the document one by one and click the relevant button for the highlighted change. This will then update the document with the decisions you make. To delete a comment box, you simply right-click and select “Delete Comment”:
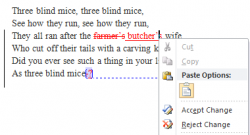
The other way of accepting and rejecting suggested changes is by using your mouse to right-click on the suggestion (highlighted in red) and select “Accept Change” or “Reject Change” from the drop-down menu.
Legal Secretaries will find Track Changes a fantastic tool for their work. Legal Secretaries will often be required to proofread work before it is sent, and Track Changes allows you to save and email your suggestions without the need to print each draft. Another great feature is that more than one person can make changes to the document and the changes will automatically be highlighted in a different colour for each user.
Track Changes is definitely a tool worth adding to your repertoire. We hope that you have found this simple guide useful. However, if you would like any further information, you can find lots of useful tutorials on the Microsoft website.